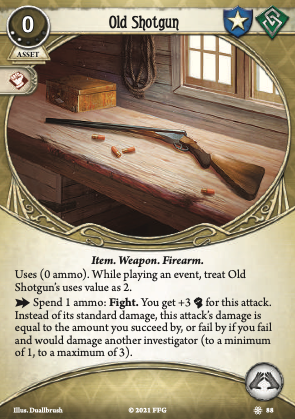
The Truth Beckons

This card is no Shortcut, that much is for sure. It's not fast so you have to get at least two moves before it does anything, and it costs a whole resource too. Your target has to be unrevealed, and not only that but your path toward that target will be interrupted if any locations along the way are also unrevealed or if there are non-aloof, non-massive enemies between you and your destination. But, for all those conditions, there is no built-in upper limit to the number of moves The Truth Beckons grants you, and in the right scenario, you can easily move three or even four times with it. To make this work, you need to either double back along a long path where you revealed multiple locations, or you can chase after a teammate who went out of their way to reveal a bunch of locations, in which case you can "leap frog" them with The Truth Beckons to the next unrevealed one. Not every scenario is going to have opportunities like this though, and while you might be satisfied that this card wasn't completely dead if it grants you just a second move, it will be strictly worse than Shortcut in that situation. So, where does The Truth Beckons pull ahead of Shortcut?

Slight spoilers for some scenarios ahead, in particular the location layouts.

Obviously, completely linear scenarios where you are crammed in with your teammates like The Essex County Express are right out. If this card is in your deck for a scenario like that, it's just its lackluster icons. A lot of Exploring in The Forgotten Age results in new locations being revealed in a linear fashion and players moving to and revealing new locations as they put them into play, so you can probably forget this for the majority of that campaign. In the core set mini-campaign, The Truth Beckons is probably okay for The Midnight Masks as the city of Arkham is quite a sprawl, and you might double back to search remote locations for cultists and clues.

Carcosa contains a couple of scenarios where this is a winner, though. As the most compelling example, The Unspeakable Oath ends by asking the players to trek all the way out from the depths of the asylum to escape, a task which is made difficult by the fact that the exit is a whole five locations away. Happily, unlike a lot of "resign to escape" endings, you do not start off revealing the exit, so in an ideal scenario (maybe you ask a teammate to clear out enemies that spawn along the way) this card generates four move actions and comes close to ending the game on the spot, which is unparalled value for a level zero card. Bonus points if you get your buddy out too using their Safeguard!

Spoilers over now, back to general analysis and a conclusion.

The Truth Beckons is far too narrow and conditional to be a staple movement card, but there are scenarios where it has the opportunity to blow you away with just how many actions it can generate. Foreknowledge of what you're up against helps a lot - don't play this into a scenario you know nothing about - and so does collaboration between you and your team to make it work. This is another level zero card that really makes Adaptable shine too, so any Rogues with access to The Truth Beckons should keep this card in mind. When it comes to interesting deckbuilding, I think the "narrow but situationally powerful" design of cards like this blows the "universally good but rarely fantastic" design of things like Shortcut completely out the water. I am delighted that a card like this exists, even if it won't make the cut over Shortcut in the majority of decks.

Trinity_ · 203
I'm running this card with Amanda in Innsmouth Conspiracy. It has been exceptional on the big Arkham maps. Last night in In Too Deep, we had to backtrack a long way to get a key to a flashback location. It couldn't have happened without this card. — acotgreave · 887
(to clarify: I backtracked a long way to a previously revealed location, and then my teammates cleared the way for me to move 5 locations to the next unrevealed one, ahead of the other investigators) — acotgreave · 887
There’s also a and unintuitive benefit of this card that it lets you slip past massive enemies. This is for the same reason that Zoey hates them - there is no actual timing point when a massive enemy engages an investigator (see the FAQ on Zoey’s page for more details). Instead, investigators at the same location as a massive enemy are inherently considered to be engaged. Thus, The Truth Beckons lets you wander past them! (Just not if you started engaged with one.) — Death by Chocolate · 1488
@DBC you da real MVP — Pinchers · 132
this card is stupid good in Pit of Despair, but generally very good in most Innsmouth scenarios — Zinjanthropus · 229
Read the Signs

I generally like this card very much, use it even more than Drawn to the Flame. It's a big pro for me, that it has the Spell-trait for the synergy with Arcane Initiate and now also Robes of Endless Night. In multiplayer it can chain to big-clue-turns, if you cast it before using any version of Rite of Seeking as last action. Sure, that's also possible with Drawn to the Flame, but if you then draw an enemy, you have to take care of him first. Finally, and that's more of a personal thing: I have only one core set, and from RtS I can take two copies without proxying.

However, one thing, I never really considered was the "ignore" part, even though I played quite a bit of Diana Stanley. The trigger condition is very niche, how many locations are there actually, where it matters? Even worse for other investigators, many locations that might trigger (including, but not solemnly the ones with the "Haunted" keyword) only care, if you fail the test, something you want to avoid anyway on an event, that costs two resources. Sure, once in a while, you might draw the autofail, but I at least always look to cover the second-worst token, if I play RtS,it's normally not that hard. For Diana this still matters. After all, the card ignores the effect, does not need to cancel it and triggers her ability even on success. But for others not so much. Still I wanted an overview, where there potential locations, that care about this card, and because there was no review her yet, that covers this aspect, I thought it was time to provide it. Obviously, we are running into SPOILER-Territory here, so if you don't like that, I'd advice to stop reading after the next paragraph. I will not cover "Return to" cards past Dunwich for now, as I have not played them yet, but I plan to update them and any upcoming campaigns whenever I'm ready for that.

Some notes regarding which locations work with the cards, and which won't, as this is quite tricky. It must be a triggered ability, so cards like Arkham Woods or Yard won't work, because they are constant abilities. I'm also pretty sure, that a card like Museum of Egyptian Antiquities won't be ignored, because it triggers after you investigate, so too late for RtS. However, if a card says "After you successfully investigate" (and there are some), it is fine to ignore, because just like "After you fail a skill test while investigating", this is checked in ST.6 and triggered in ST.7, so before the test has ended. I think, I found all the cards, that are eligible to be ignored, but if you think, I missed one, please mention it. Very much appreciated.

(Return to:) The Night of the Zealot

There is not a single location, that would trigger in the core box, however three in the "Return to" box. Two of them are in "The Gathering". Even though one is "basically Haunted" without the keyword, so not very interesting for anybody except Diana, the other effect might sound familiar from Rite of Seeking and is sure nice to ignore. Both of the cards you will see reliably in any game of "Return to the Gathering", unlike the third card, which is randomly chosen or not among the "Arkham Woods" location in the third scenario. But if you get it, you'll sure like to ignore it.

(Return to:) The Dunwich Legacy

The Orne Library won't trigger, because it is a constant ability and furthermore even a cost you have to pay, before you are able to play the card. However in "Return to Extracurricular Activity" it may be swapped with the Warren Observatory, which has a nice effect to ignore. There are quite a lot of "basically Haunted" cards in Dunwich, one in "The House Always Win", four of the eight "Exhibit Halls" in "The Miskatonic Museum" (one of them from the "Return to" set) and one of the two original Burned Ruins in "Blood on the Altar". If you are playing with the "Return to" set, you have a 1 in 3 chance to draw the new Burned Ruins, that triggers on success. The biggest impact in this campaign have the alternate versions of Base of the Hill and Ascending Path from "Return to Where Doom Awaits". While the locations from the original scenario had been a road block for any investigating with , including with RtS, the bug fix from the Return version can be exploited in true solo to use the clues on advancing the act, rather than putting the side locations into place. Both location provide only 3 clues, and you need 2 to advance, so there won't be enough clues for that clearly unintended cheese in multiplayer. (Though with 2 players, you could bring one of the side locations into play, and if it doesn't happen to be Destroyed Path, get the two remaining clues from the Sentinel Hill location.) Finally in "Lost in Time and Space" Prismatic Cascade is sure nice to clear with RtS, while Towering Luminosity from the "Return to" set is yet just another "After you fail a skill test".

(Return to:) The Path to Carcosa

In general, all eligible locations in this campaign trigger one way or other on successful investigations, which is particular nice, as they have either one or two shroud. But only two of them, in The Unspeakable Oath and A Phantom of Truth, have 2 clues, all the other only 1, which is less nice for solo investigators. The location in Curtain Call deals you 1 horror, if you succeed by 2 or more, while in Black Star Rise you are punished with doom for succeeding by 1 or less. In "Dim Carcosa" there are even 6 locations, 3 versions of Ruins of Carcosa and 3 of Dim Streets, each triggering after discovering the last remaining clue. You won't have the card from "Curtain Call" in every game, and neither all six from "Dim Carcosa", but a total of 10 locations, where you can ignore something is quite high, and it might be worth considering RtS for that aspect alone, in particular in a 2 player campaign.

There are just a couple of new cards in the "Return to" box: Prop Shop from "Curtain Call" does not sound that interesting: it's another "basically haunted" location, and even one with an effect, which might be desirable to choose to not ignore, to increase the odds on further investigations. Exceptionally meh in solo, as there is only 1 clues on the location. The Museum Storage in the Historical Society (from "Echos of the Past") on the other hand is an A++ effect to ignore: it places a clue from the location to the cultist farthest from you (flipping it to it's doom side), if you reveal a , , , or during the test. Regardless of failure or success.

(Return to:) The Forgotten Age

Here you will find only 6 locations: Ruins of Eztli in "The Untamed Wild" threatens you with drawing an encounter card on a failed investigation. Investigating Grand Chamber ("The Doom of Etzli") and Perilous Gulch ("Heart of the Elders" B) might end up with doom on the location. The last three are all from "Shattered Aeons": Plateau of Leng is probably not worth considering. It has a very minor triggered effect and only 1 clue, regardless of #. Atlantis triggers independent on the location an is revealed during a test. Of course, with RtS you could only ignore it, if you are investigating while in Atlantis with this card. Mu's effect triggers on revealing , , or and would be sure nice to ignore.

The "Return to" box adds two cards to the pool of Rainforrest locations, that can potentially see play in several scenarios. Waterfall is again a "haunted" card without the keyword, but also the only one of the "Return to" set, where the negative effect can't be avoided with the propper supplies. Riverside Temple requires to shuffle an encounter card for each clue into the exploration deck, but that can be avoided with Chalk. The other two cards are from "Heart of the Elders, Part 2": Chthonian Depths adds a doom, when taking the last clue (unless you have torches), the Subterranean Swamp is again "haunted", but only without a pocket knife. With 2 clues it is also more yielding than the others, which all just provide 1.

(Return to:) The Circle Undone

In "The Witching Hour" 3 of the 7 "Witch-Haunted Woods" have triggered abilities, that let you loose resources or cards for every clue you discover or even spawn an enemy on discovering the last clue. And they all come with 2 clues and Victory 1. Even though, there are always only 4 of the locations in the game, and some of them maybe not within reach for you, I would say RtS is worth considering for any for the effect alone, if nothing else at least for the first scenario. "At Death's Doorstep" features Meiger's Office as last location in this campaign, that is not Haunted, and still can be ignored. In the second half of the scenario six of the seven locations become Haunted, which is not ideal for Diana to level up , as it's probably too late in the game. She might still get use out of it, if she has played her Twilight Blade or after pulling the . "Secret Name" has six Haunted locations, technical even seven, but one is without clues, and I don't think Diana would like to play RtS just for healing. In "The Wages of Sin" all 7 locations are Haunted, but only after they are flipped. "Union and Disillusion" is the scenario, where Diana definitely wants to keep this card in the starting hand. All except the starting locations are Haunted right from the beginning. And finally "Before the Black Throne" has again one Haunted location.

There are five new haunted locations in the "Return to" sets: the spectral version of Wine Cellar from "At Deaths Doorstep", The 9th Ward and The Price Manor from "The Secret Name", a new version of Hangman's Brook from "The Wages of Sin", and finally Winding Gulf from "Before the Black Throne". There is also a new Arkham Woods location that lets you mill the encounter deck on over-succeeding. (Very easy at 1 shroud and only 1 clues, so who would use RtS here?) And also a new version of Witch-Haunted Woods, that lets you draw a Hex on the last clue, again with shroud 1, but at least 2 clues and Victory 1.

The Dream Eaters

There are a decent amount of eligible locations in The Dream Quest, six in total, but all but one 2 location are 1, so far from ideal for solo investigators. 4 locations are in "The Search for Kadath", where the card was released: Sarnath, that triggers on succeeding by 1 or less, Ruins of Ib, that trigger on revealing a or , Mt. Ngranek, which is a weird one, as you can bypass the triggered effect by other means, and the City-Which-Appears-On-No-Map, which is the 2 location, but triggers only on failing the test. "Ruins of Ib" is probably the meanest of all, requires you to remove an asset from play, while Sarnath only deals you 1 horror.In "Dark Side of the Moon" you will find Temple of the Moon Lizard, which has a scaled effect on how many clues you discover. So RtS can potentially save you from taking 2 horror or discarding 2 cards, in a multiplayer game. Finally Cold Wastes from "Where the Gods Dwell" are triggered by revealing a , , , or and deals 1 damage or lets you loose an action.

The Web of Dreams on the other hand has only two locations, both 1: Morgue from "Waking Nightmare", which requires an "infestation test" after clearing the location and Sea of Bones from "Point of No Return", which is again very situational, whether you want to ignore the effect. If you know the consequences, you might either face an XP enemy for the first time, which can be desirable, or return him into the game back from the victory point display, which is definitely not.

The Innsmouth Conspiracy

There are no triggered abilities in the generic "Tidal Tunnels" (just constant, that can't be ignored), so "Innsmouth Conspiracy" comes with only 3 Scenarios, having eligible locations. "The Vanishing of Elina Harper" comes with the most: 5 locations. However, from the two, that start in play, one is another defacto-haunted location (though a rather impactful) and the other has an effect, you normally don't want to ignore. The three hideouts are more interesting. There is still a "haunted" location, which adds doom to the board on failure and has 5 shroud, which can be lowered with the doom you place on it, so definitely a location to consider, albeit rather for the high shroud, at least in multiplayer. The second removes the top card frm the lead deck, if you clear it from clues. An effect, you definitely like to avoid, as it could be an important lead. The last one looks yet like the best from the campaign. Other than the other hideouts, it has 2 clues, so it will net you both clues even in solo. It is also a location with just 1 shroud, but a severe penalty on over-succeeding, as it will water down the lead deck with encounter cards. On each test, so getting multiple clues in one action is further recommended.

There is not a single further location until the penultimate scenario, but even that one is as uninteresting, as it get's. "Haunted" to deliver you 1 horror, with 1 clues. The final "Into the Maelstrom" comes with 2 copies of a Tidal Tunnel on which you could potentially avoid raising the flood level. This would be pretty high impact in Act 2. Alas, it's a location from Act 1, so I wouldn't bother with the effect.

Edge of the Earth

There aren't many targetable locations in this campaign. Note, that there are a few, which will modify the first frost-token to -3, but as a constant ability, so ignoring it won't work.

At most, you'll find 5 locations in "Fatal Mirage". These are also the only locations, that provide multiple clues in solo. (Of the locations with abilities to ignore, of course.) Coastal Waters and Standing Stones are take it or leave it regarding the ignore effect of RtS. After revealing a frost-token, you are dealt a horror or damage, but are rewarded with an additional clue on success. Luckily, RtS states, you may ignore the effect. Dr. Kensler’s Office deals 1 horror or removes a secret on a successful investigation, Deck of the Theodosia makes the investigation more difficulty or costs a ressource, the "winner" imho on most impactful effect to ignore is Elder Chamber, which would normally add a Tekeli-li card to your deck.

"Ice and Death" comes with one location: Treacherous Path deals 1 damage or 1 horror for each frost-token revealed. Ruinous Streets (for damage) and Temple of the Elder Things (for horror), from "Ciry of the Elder Things" act similar, but cap out on 1 damage respectively horror, and don't give you a choice. There are also two copies of each in the set.

Susumu · 381
Spirit of Humanity

Of course, Calvin Wright or Tommy Muldoon want this card for dealing damage/horror source. But, this card is great with Father Mateo. You could play Priest of Two Faiths, and trigger ability and assign damage and horror to Priest of Two Faiths. You could add total 7 tokens (and 1 token if you have only 1 Spirit of Humanity).

elkeinkrad · 500
Try and Try Again

Try and Try Again works at ST.6, so it don't work with Take Heart or Predestined working at ST.7. However, Try and Try Again works with skill cards working at ST.2. You could commit Unrelenting to draw 2 cards and return it. You could commit Signum Crucis to add and return it. Try and Try Again don't require any slot unlike Grisly Totem. You don't need to pay additional 3xp for Relic Hunter. Eventually, Try and Try Again can be utilized for fail-based deck.

2 Drawing Thin + Grisly Totem + Take Heart + Try and Try Again + Unrelenting + Rabbit's Foot (+ Relic Hunter) 5 cards + 6 resources. Stella will be very happy with 10xp (or 16xp if taboo).

elkeinkrad · 500
Can you point to the rule? It seems weird to do the "after" of T&TA before the "if" of Take Heart. — Timlagor · 6
@Timlagor // You can check the detail of this ruling from one of the Take Heart review; check https://arkhamdb.com/card/04201#review-945 — elkeinkrad · 500
I think this is the most non-intuitive ruling in AHLCG. When you check the order of timing "during test", you should firstly find which step is related. This is because the strange timing is generated. — elkeinkrad · 500
Even the FAQ says this in sec — AlexBlume · 1
(2.2) Timing of “At…” or “If…” abilities Some abilities have triggering conditions that use the words “at” or “if ” instead of specifying “when” or “after,” such as “at the end of the round,” or “if the Ghoul Priest is defeated.” These abilities trigger in between any “when…” abilities and any “after…” abilities with the same triggering condition. — AlexBlume · 1
So if "if" cards happen in ST.7. how the heck does TATA which says "after" happen in ST.6.?? — AlexBlume · 1
Nevermind what I said before, the Arkham FAQ specifically addresses this in section 1.7: (1.7) Skill Test Results and Advanced Timing During Step 7 of Skill Test Timing (“Apply skill test results”), all of the effects of the successful skill test are determined and resolved, one at a time. This includes the effects of the test itself (such as the clue discovered while investigating, or the damage dealt during an attack), as well as any “If this test is successful…” effects from card abilities or skill cards committed to the test. <Reaction Triggered Ability symbol> or Forced abilities with a triggering condition dependent upon the skill test being successful or unsuccessful (such as “After you successfully investigate,” or “After you fail a skill test by 2 or more”) do not trigger at this time. These abilities are triggered during Step 6, “Determine success/failure of skill test.” — AlexBlume · 1