-
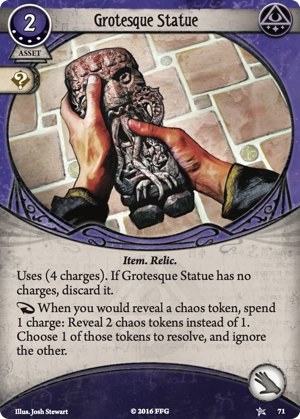
If you use Grotesque Statue to 'ignore a chaos token', treat it as if you've never revealed that token, for purposes of effects that trigger if a specific symbol is revealed (e.g. Blinding Light).
-
Clarification: When you use multiple effects that replace “revealing a chaos token” with something, else, you must first declare your intention so you are reacting to what you draw from the bag, because each of these effects are meant to be triggered before you draw tokens from the bag. If you declare you’re going to trigger Olive McBride's ability first, you should then declare which of the 3 tokens you’re about to reveal from Olive’s ability will be turned into 2 tokens from the Grotesque Statue (For example, “I’m going to reveal 3 tokens using Olive, and for the first token, I’m going to reveal 2 instead of 1 using my statue). Then you’ll ignore one of the 2 statue tokens, and be left with 3 total tokens, which you’ll then ignore 1 of. (All of these tokens are considered to be revealed simultaneously, so you are not allowed to reveal the first 2 tokens with Olive, and then decide whether or not to use the statue). If you instead trigger the statue’s ability first, you would do the same thing, declaring your intent. (For example, “I’m going to reveal 2 tokens using my statue, but for the second token, I’m going to use Olive’s ability to reveal 3 instead of 1”.) Then you would choose between resolving the first token or the 3 Olive tokens. (Here this may seem a little strange, because Grotesque Statue says “Choose 1 of those tokens to resolve, and ignore the other,” which implies that you only get to resolve 1 token and ignore 1 token, but for the purposes of resolving these types of effects, the 3 tokens revealed from Olive’s ability should be treated as 1 revealed token.) If you decide to resolve the 3 Olive tokens you would then choose 2 to resolve and resolve the other, as usual. - FAQ v.1.3, May 2018
-
Q: Can I trigger Grotesque Statue's ability multiple times in one skill test? A: No. Each reaction triggered ability may be triggered only once each time the specified condition on the ability is met, and cannot react to itself. An investigator cannot trigger Grotesque Statue’s reaction ability multiple times for a single test. (September 2023)
Soutien. Main
Objet. Relique.
Coût: 2. XP: 4.
Utilisations (4 charges). Si la carte Statue Grotesque n'a pas de charges, défaussez-la.
Quand vous devriez révéler un pion Chaos, dépensez 1 charge : révélez 2 pions Chaos au lieu de 1. Choisissez 1 de ces pions et ignorez l'autre.

Cartes en relation
- Grotesque Statue (2) (Jacqueline Fine #21)
- Grotesque Statue (4) (Revised Core Set #71)
FAQs
(from the official FAQ or responses to the official rules question form)Reviews
There's something to be said for the simple cards. Tentacle mouth guy is one such card.
Let's look at the numbers: 2 resources for 4 charges and a single hand slot, plus a ? icon, for 4xp. All tasty apart from that xp cost, both because it limits which investigators have access to the statue, as well as being a hefty investment in itself. That said, cards don't at the moment tax hand slots particularly, so adding bonus hand items isn't particularly punishing. Moreover, while in a scenario, paying 2 for 4 'double' draws is incredible value. As with all abilities, it's optional, so you can pick which tests you want to use it (before drawing the chaos token). And, by way of comparison, consider Wendy's 'redraw' ability, which, yes, is theoretically limitless, but costs a card for each redraw and, crucially, does not allow a choice between the two tokens (the second replaces the first - and could be the very same as the first).
One simply shouldn't underestimate the potency of choosing to double dip into the chaos bag. Even on tests where an investigator is feeling confident, being able to choose, for example, a instead of a -1 to trigger further effects (such as Agnes's ability) or vice versa to avoid them is incredibly powerful - after all, the statue is in the same faction as spells, from Shrivelling to Blinding Light, which come with additional risks for non-numeric tokens. Choice is crucial here: a normal skill test requires an investigator to overcommit to aim to mitigate the vicissitudes of the chaos bag; an investigator with the grotesque statue can, in a pinch, give themselves options, and options = power.
I’m having a bit of a hard time quantifying the strength of this effect. It seems like it has about a 50% chance of combining a bad token draw with a good one, thus giving you a great choice. Two good tokens or two bad ones drawn together is not as helpful. Also it seems to be better on higher difficulties, where the difference between good and bad tokens is larger. But I think the card might be a bit overrated because of the high XP and the significant chance of drawing two similar tokens.